Wednesday, December 30, 2015

Petal to the Metal

Hi, hope everyone's holidays have been fun! Around here, as with most folks, some things sped up and others slowed down.

After this...

Gift-wrap Central
cutting out Lucy's (giant) quilted Minnie Mouse stocking


     ...and this....


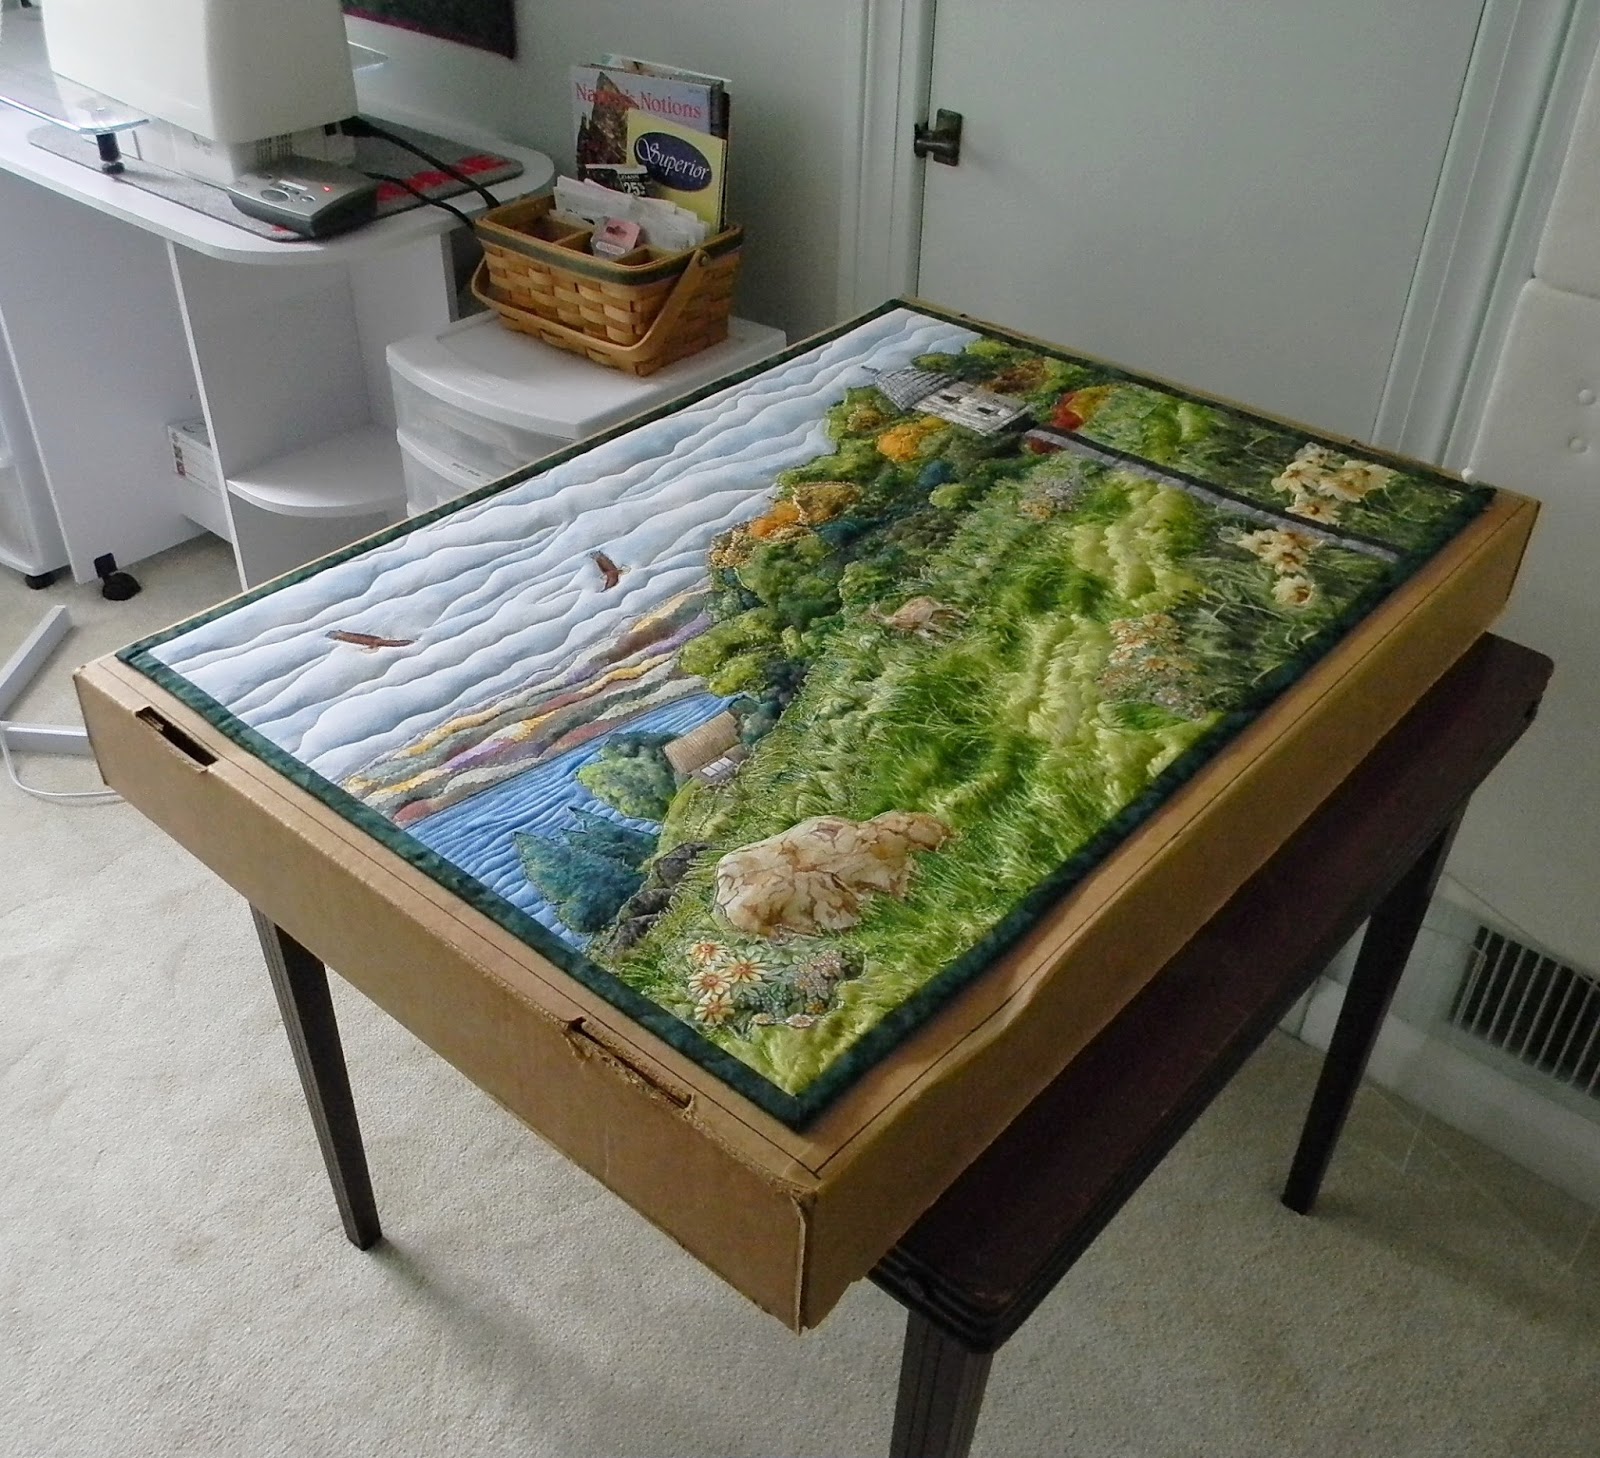
were finished, it was full speed ahead (as much as possible) on the work in progress.

As mentioned in the last blog post, I envisioned a large-scale flower against this pieced background of hand-dyes. So, voila!--it appeared.

First I thought there were too many flower petals here...but it turns out, there are too few!
Well, okay, it only appeared after some drawing and tracing. (Notice the kitchen paraphernalia that came in handy here.)


Meanwhile, some of nature's other creatures and features also appeared from my stash for auditioning, along with some Northcott Stonehenge fabric (thank you, Alex and Shannon) for a bottom border--which went a long way toward grounding the whole scene.

Fortunately for me, frost asters continue blooming in autumn!
I liked the fact that the foreground colors were echoed in the leaves near the top, but felt that some blue needed to be in the foreground for balance.

After auditioning a traced profile with some blue fabric pinned to it (below at left), I decided to go ahead and piece and paint (and color-pencil) a blue jay.


After that it was time to take a break and audition some thread. These are the variegated spools my dear friend Janet recently gave me when she decided to switch to a different line of thread for her longarm. Some of them should work really well for this project.

Like my storage method?

With a few more tweaks to the quilt top, I hope to sandwich the quilt and put PEDAL to the metal in the next couple of weeks.

I hope you've been able to squeeze some quilting time into your holiday schedule. If you're anything like me, nothing maintains or restores your sanity like working on a quilt.

Happy New Year, everyone!!

Linda

Thursday, December 10, 2015

Starts and Stripes

This week I pulled (once again) some hand-dyed gradients from my stash to pin on the design wall for yet another good, long stare. These gorgeous fabrics always give me an infusion of inspiration.

Hand-dyes from the Vicki Welsh shop on Etsy
From the day they were ordered, I started mentally designing a landscape quilt with each piece. But after a couple of years of periodic auditions and longing contemplation, I finally had to concede that, for what I had in mind, there really wasn't enough fabric (only a half-yard each). By the time each piece was quilted and squared, it would be too narrow for my original idea to work well. Bad planning from the get-go.

'Let your plans go,' I told myself. 'Let these pieces work together, instead, to come up with something totally different.'

So--horror of horrors!--I would cut and piece them. (No doubt, Vicki Welsh wouldn't have the slightest problem with that, but in my funny little head, these fabrics were meant to stay intact, by golly, with all their lovely, organic, gradient morphing untouched.)

You'd have thought I was a reluctant surgical intern. Rotary cutter, please. Aaaaaaggggggghhhhhhhh! It was painful, but with grim determination on my part, each of these three beautiful pieces was cut mercilessly into strips.


And the first audition wasn't bad at all...I liked it.


But on second thought, something was a bit too predominant for me...the orange. If this was to be a landscape background, it would probably have to be a forest fire.


So another 1/2-yard piece was pulled from the stash--the middle piece in the photo at right (fabric washed but not yet ironed). My thinking was that the strips on the design wall above needed some green to cool them down, and maybe some more gold to level things out. And there was blue in it, to top it off.

After rearranging the strips a few times, I really liked what I saw and went on and sewed them together so there would no longer be any question about it. Moving forward!


I still didn't know what was going to happen with this, but had long ago learned to trust the muse and the process. So, no worries. One element did keep popping into mind--a particular flower, large-scale, against this background. And later, when my son took a look at the background and said he could imagine an autumn scene there, I was off and running. More to show next week, hopefully.


The photo at left was taken totally by accident; the button was pressed unintentionally while the camera was in motion. I'm glad it happened, because it turned out pretty cool.


Have a great weekend!

Linda

Thursday, December 3, 2015

Quilt-As-You-Don't-Go

Pretending it hasn't been a month since my last blog post, I'll just casually pick up where I left off.  :)

After finishing The Overlook, my last landscape quilt, I went back to the donation quilt begun a few weeks before. It's a quilt-as-you-go and sort of a crazy quilt, in that the blocks are pieced in a wonky way.

However, the idea with this particular QAYG was to use no joining strips. Instead, you baste each row of the quilt top to an oversize strip of batting, then quilt each batted row one at a time to a whole-cloth backing. A good friend of mine has been doing this for years to cut down on bulk and weight on her small sewing machine. You start with the middle row and quilt it to within an inch away from the edges. Then you seam that row to the next row of blocks, trimming the batting to meet up with the previous row of batting and connecting the batting with either hand-basting or iron-on batting tape. Commence quilting, including the inch you avoided quilting in the previous row. As in the traditional QAYG method, you're keeping the bulk of your work to your left while quilting on the right.

The upside to this method is, again, that there are no joining strips to deal with, since you've already joined your blocks (sashing optional), and the back is whole-cloth (or pieced, like mine, into one big backing). 

The downside(s) to this method did not become apparent until I was quilting the third row. Using a free-motion stipple, I noticed it was getting more and more difficult to move the quilt. By the end of that third row, with two rows to go, I was so stiff and sore that I halted the project to figure out what my problem was.

And finally it hit me. There were actually two problems. First of all, my friend, who as mentioned uses this method all the time, never uses commercial batting. She always uses an old flannel sheet...warm but lightweight and very supple. I, on the other hand, was using a fairly heavy cotton batting.

The other problem was the difference in my quilting and hers. She uses a dual-feed foot and a straight stitch for the entire quilt, either in a grid pattern or stitch-in-the-ditch. I was free-motion quilting with the feed dogs down. Huge difference!

Knowing I didn't have the physical prowess to continue stippling, I attached the dual-feed foot, returned the feed dogs to the 'up' position, and marked some lines on the remaining two rows. Because of the weight, though, I still couldn't maneuver the quilt the way my friend does, so with every line of quilting, instead of turning, I had to break thread and start the next line fresh. What I should have done to save some of this hassle was quilt the last two rows at once, instead of continuing quilting one at a time. Hindsight is great, isn't it? So all told, there are now dozens of knots buried behind those last two rows.

Here you can see the transition from free-motion stipple to feed-dog-driven serpentine stitch.
A couple of other problems ensued along the way, but I'll spare you those. Suffice to say that the upshot of it all is, I don't trust this quilt enough to donate it. It will stay right here in my house where it can be observed throughout several launderings to see how well it holds up. Lesson(s) learned!

Extra-long twin bed.

The pieced back


I had no suitable fabric to make binding, so leftover strips from the back edges were pieced together instead...which is why you see white areas on the binding.


Here's my favorite block, but only because of the center motif:


So, done and done. And never to be done again. Back to the usual QAYG method for me--joining strips and all!

Have a wonderful weekend~~

Linda

Wednesday, November 4, 2015

The Overlook

...is finally finished, except for the hanging sleeve on the back. (Click on any photos to enlarge.)

(pardon the pins, but the quilt probably wouldn't stay on the design wall without them)
And against all odds at first, the darker bare shrubs were included in the end. The one thing I don't like about that is that the bare white shrub is practically invisible by contrast. But during auditioning, it became obvious that the center shrub gave the quilt added depth (despite also adding a bit of clutter to the scene), while the dark shrub on the right actually helped draw my eye to the birdhouse. Since they each had something positive to contribute, they were allowed to stay.

Here is the original photo, taken a couple of years ago at the Overlook Restaurant in Leavenworth, Indiana. You can see that some changes were made, due to 'artistic license' (mostly simplifying).


But there's some botanical license here, as well. A good bit of the meadow had browned out, as you can see, since autumn had arrived. However, my brown grass fabrics looked dull and out-of-scale for this middle ground and foreground. And we're not even going to discuss whether or not my flowers should really be there! Also, for weeks I'd debated on how to stitch that gorgeous clump of ornamental grass in the center of the photo. After nearly deciding to do it with bobbin work, on impulse I auditioned all the green grass fabrics instead. I liked them so much that the ornamental grass clump went out the (metaphorical) window. Earth science be darned, I would have my green meadow and my autumn leaves! Besides, some of the trees in the photo were still green, and much of the red foliage in the photo wasn't included in the quilt anyway. So, I'm thinking the quilt scene is about two weeks behind the photo scene, season-wise. Yep. That's my story and I'm stickin' to it. ;)

My real point here is that if it's your landscape quilt, you're the boss. Nature is somewhat (or totally!) at your mercy.

Here are some closeups.

The two main trees were thread-painted on green tulle in an embroidery hoop. After all quilting was done, they were appliqued to the quilt with a free-motion straight stitch near the raw edges.

The bare shrubs were thread-painted over muslin and air, in a hoop (for more about that, click on the 'shrub' link above). They were the last elements to be attached (hand-couched).

The trunk is bobbin work (thread-painted in a hoop, right-side-down) in a size 20 variegated cotton thread.

Actually, turkey buzzards, not eagles, glide constantly above the Ohio river at the Overlook Restaurant. Please let me know if you ever see buzzard fabric anywhere!

White tulle was laid over the river to dull the intense blue; also over the background hills to 'fade' them for the illusion of distance.

This photo's a bit crooked--and I used a tripod!! Anyway...the birdhouse was constructed off-site, edges turned under, and straight-stitch appliqued on top of the already quilted forest.

A somewhat blurred shot of the darkest bare shrub. The post edges are not turned under. Those are raw, fused edges. I like the 'splintery' look of it. Not crazy about the horizontal wrinkles, but didn't want to quilt the post interior, as that would flatten it.

Here are a couple of photos where the quilting is more obvious.


The trees and the birdhouse puff out a bit, even without extra batting.

Off subject: Speaking of autumn, just had to include a couple of Halloween photos here.... 


This is Lucy, my sweet, only grandchild and the recipient of all items made to go in the often mentioned 'Lucy drawer.' She did not go trick-or-treating, as she is eating only pureed fruit/vegetables and teething crackers at this stage, but she seemed to enjoy being dressed for the occasion. (And Zoe, our diva cat, wanted that tutu now.)

Hooking up with Whoop Whoop Fridays. Check out the beautiful quilts going to Ethiopia!

Have a great weekend,

Linda

Thursday, October 29, 2015

Two Trees & a Shrub Away from the Finish Line


This week The Overlook was squared, trimmed, bound and blocked. I usually block first, but the quilting was fairly even and was spaced far enough apart that the quilt really wasn't much out of square.

After squaring it with rulers and a marking pen, I stitched a line all around, just inside my marked line. That's to secure any quilting stitches at the edges before the final cut is made on the marked lines.


After blocking. You can see the T-pins between the binding and the quilt.

(also after blocking)
The quilt just barely fit on my 'blocking box' --the bottom section of a large but shallow shipping box, which I perched on top of a card table. It was nice to not have to work on the floor.

The box has a squared line drawn in permanent marker around the edges. It also has a lovely dent from being squashed in the attic door (thanks, son), so I propped up that section of the quilt with a partly folded fat-quarter to keep it level.

Two layers of an old cotton sheet were laid over the quilt, misted with water until damp (not wet), then well-steamed a couple of inches above the surface with my iron.

The quilt was left untouched overnight and most of the next day. By then all layers were completely dry. Even though it was fairly square to begin with, blocking gave it a more 'finished' look, shrinking out any flabby sections and smoothing the whole quilt without taking away any of the texture or puffiness. It's hard to describe, but there's definitely a difference.

Both trees passed the final audition and were attached this afternoon by free moton machine stitching. This weekend one (or maybe two) of the three shrubs will be re-auditioned. If all goes as planned, the quilt should be finished early next week.

While the quilt was being blocked, the vinyl overlay used in designing and piecing the quilt top was spread out for cleaning---the idea being to wipe the 'permanent' marker off with rubbing alcohol, since any errant lines during the initial drawing had been successfully removed by those little alcohol pads that come in individual wrappers.


Well, so much for that plan. Apparently, if you leave permanent marker on vinyl long enough, it does become permanent. It did fade from black to blue (notice the upper half), but that's as far as the cleaning went. Then again, maybe it's the alcohol. As mentioned, I used the little individually wrapped pads when correcting my lines during drawing. But when attempting to clean the entire piece of vinyl, I used paper towels and isopropyl (rubbing alcohol) from a bottle--which didn't seem to smell nearly as strong. Might there be a difference? I wonder now. If anyone knows, please share. Didn't think to test it at the time. Maybe later.

Anyway, now the vinyl (and the paper it came with to keep it from sticking to itself) are rolled up on a mailing tube and labeled 'used vinyl.' I'll use it to paint fabric on, or for some other messy job. Very little goes to waste around here.

Time to sign off. Loving this fall weather and being upstairs with the studio windows open, but I do wish our fall color was better this year. Overall it's just been too dry. Here's a shot from one of the windows.

Before I go, though, I'm linking up with Whoop Whoop Fridays and Free Motion Mavericks. Check them out and get ready for lots of inspiration!

Have a wonderful weekend, wherever you are this fall (or spring, depending on your hemisphere).

Linda

Friday, October 23, 2015

To Tree or Not to Tree

Last week there wasn't much to show on the Overlook landscape, although the quilt-top piecing was finished. This week brought more action.


Binder clips and masking tape were used to hold the backing smooth (not taut--which is generally a mistake. Guess how I know. ;)


Before layering the quilt top on the batting and the backing fabric, a final sticky-roll was done on the back of the quilt top. It was the last time I would ever see this surface, and I don't want any nasty surprises showing through the sky fabric after the quilt is done. Too late then!


The old vinyl-covered, lead pattern-weights shown in a recent blog were used to hold the batting in place for basting.
 After many hours of free-motion quilting (including the satin stitching), it's close to being finished...


...except for the handwork, consisting of two thread-painted trees and two or three shrubs (stacked behind one another in the photo), which will be tucked under those un-quilted grass sections---but only after the quilt is blocked, trimmed and bound. This keeps the trees and shrubs from getting ratty during quilting and handling.

Their positions have been tentatively decided, but they will be auditioned again before attaching. That's because there's a fine line between embellishing and cluttering, especially in a scene this busy. Also, having the binding already on is going to make a difference in the overall appearance of the quilt, which means some of these thread-painted pieces may look better switched or may even need to be omitted.

So, to tree or not to tree....that is the question. Or will be.


Meanwhile, the rows for the twin-size donation quilt are still waiting. The batting pieces are cut but the backing still needs to be pieced. Looking forward to trying this method of quilting and joining, one row of top and batting at a time, onto an overall, one-piece backing. (My shoulders and neck are not yet ready to wrestle with a whole quilt at once, regardless of the size of my harp space.) My friend Kathy quilts this way all the time, and her quilts are gorgeous. Crossing my fingers I can do her proud.


Linking up with Free Motion Mavericks and Whoop Whoop Fridays. Check them out; you'll be glad you did.

Have a wonderful weekend, in whatever hamlet you happen to live.

Linda

Thursday, October 8, 2015

Fiddly Bits

This week, piecing on the Overlook quilt came down to the last stage, the 'fiddly bits' (I love that expression!). They are fused/glued, and the raw edges are being basted by machine.


The red flower-head pins are reminders not to baste those areas where tree and shrub trunks will be inserted behind a fabric layer. At present I'm thinking that at least two embroidered shrubs will be used on the quilt, as well as two of the three thread-painted trees. They'll be attached after all quilting is done.

The eagles are lower in the sky than I like, but by the time the top edge of the quilt gets trimmed, the higher eagle will barely escape with his wingtips intact.

Off subject, last weekend a dear friend gave me what was left of her Superior Rainbow thread after switching to their Magnifico line for her longarm. I was floored at her generosity (and not for the first time). There are tons of thread left on most of these large spools, and I can't wait to start playing with it!


Also off the subject, another addition to the Lucy drawer.


VVHH (very versatile handy husband) does not like this sweater. He thinks it's strange-looking. I think it's funky and cute. And it's warm and soft (they all are). Again, a variegated yarn from Deborah Norville's Serenity Chunky line, this time in a colorway called 'Cattails.' I was hoping the front pieces would match better, but it's really not a big deal.

Update: Hooking up with Whoop Whoop Fridays. Look what Sarah and the mission team will be delivering this weekend. Also linking in at WIPs Be Gone. Beautiful quilt block, and there's a book giveaway going on!

Speaking of weekends, have a great one.

Linda


Thursday, October 1, 2015

Bird's-Eye View

This week the birdhouse in the Overlook quilt was designed and pieced, off-site. Meaning, on my ironing board. (And a light box.)

Made the birdhouse body from a light woodgrain fabric, edges pressed under and ready to fuse to the quilt. Fused Steam-a-Seam 2 Lite to the back of a nearly-black woodgrain fabic to make the openings.

Cut out the roof after tracing shingles and shadows onto medium-gray woodgrain fabric. Edges are pressed under and ready to fuse to the quilt. Cut the post from two different woodgrain fabrics, black fused to gray, as one whole side is in shadow. Shaded the body of the house with gray Sharpie (only after testing on scrap fabric). Drew the perches with black and gray Sharpies.

Changed some of the gray shading to black--just wasn't enough contrast in pure gray. Is it scary, shading finished construction with a permanent marker? You bet it is! But it almost always works out okay--especially if you've tested it first on scrap fabric. Just need to take your time. And you could shade it before all the construction is done. It seems to be one of the few instances where I like living on the edge.

Ready to cut the finial out of rock fabric. Didn't want a solid. Going for a patinaed pewter look.
Test-fitted the birdhouse (sans finial) on top of the vinyl overlay.


It works! Some touch-ups are needed (blacking out the woodgrain in the black metal base under the house, for instance), but we'll get there.

This may be the first time I've turned under my applique edges. This method of applique has its perks, obviously, but has drawbacks as well. For example, the roof edges. There's no way to turn the fabric precisely under all those shingle overhangs without lots of detailed clipping and pressing. I just turned under the whole edge--and close up, you can tell. Then again, landscape quilts are meant to be viewed from some distance. And sometimes I have to remind myself that they are quilts--not photographs. Purely representational.

Coincidentally, VVHH and I made the 45-minute drive to have lunch at the Overlook Restaurant last week. It sits at the top of the hill that you see in the quilt.

Overlook Restaurant, Leavenworth, IN

Great views of the Ohio River abound, with decking galore and windows on all sides of several bump-out dining rooms. Here's one of the views.

Note the cabin roof among the trees.

Speaking of birds-eye views, groups of buzzards often float on the air currents above the river, putting on quite the graceful ballet very close to the restaurant windows. In tribute to those underrated birds, a couple of eagles will probably be added to the quilt. I've yet to see buzzard fabric anywhere.

Off subject, the Lucy drawer now holds two sets of knee pads for those days when she's practicing walking (and falling)...and it won't be long now!

Deborah Norville's self-striping Serenity Baby yarn

Linking up with Whoop Whoop Fridays, where I think Sarah might have set a record for quilt production this week. Tons of great hookups there with her readers, too.

Have a wonderful weekend!

Linda